구글은...서비스가 너무 많아..
1. 기본설정
- 구글 클라우드 플랫폼에서 서비스계정 생성
- 구글콘솔에서 서비스계정 권한위임
2. 인덱싱 요청 (Python) 코드
1. 기본설정
구글 클라우드 플랫폼에서 서비스계정 생성

구글 클라우드 플랫폼에 들어가 create service account 클릭

계정명 입력. 2,3단계는 optional이기 때문에 건너뛰어도 됨.

생성된 계정(이메일)을 복사해둔다.
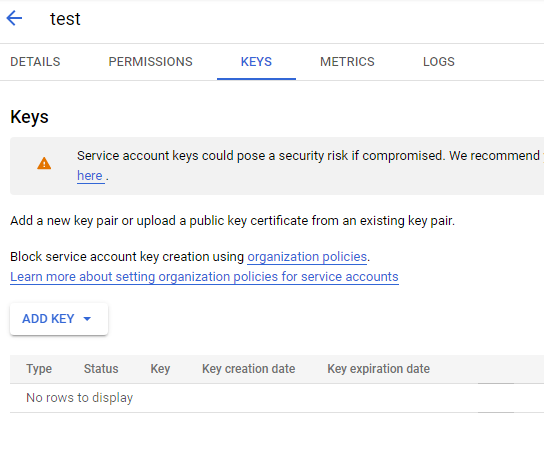
테이블에 생성된 계정의 keys에 들어가 ADD KEY 를 눌러 키를 생성 ( json 추천)
계정 키 json 파일 다운로드 됨.
구글콘솔에서 서비스계정 권한위임

구글서치콘솔로 돌아간다. 원하는 블로그의 setting에 들어가 add User 누르고 아까 복사한 서비스계정(이메일) 등록. 권한은 Full로 되어있는데 후에 Owner 바꿔줘야 한다.

owner 권한을 주기 위해 owner권한을 가진 계정(you)의 우측에 메뉴 → "Manage property owners" 를 눌러서 webmaster central 로 이동함.
(나는 이미 계정에 owner 등록을 한 상태라 (you) 밑에 계정이 뜸)

Webmaster central 에서 권한 위임할 블로그 선택

소유자 추가하기 (아까 생성한 계정 이메일)

후에 콘솔에 돌아와 보면 다음처럼 계정에 오너로 추가되어 있다.
2. 파이썬 인덱싱 요청 코드
batch request로 돌리고 싶은데. 그럴러면 인덱싱안 된 (excluded) 페이지만 또 가져와야 하고.. 이것만 가져오는 API는 또 없는 것 같은데.. 잘 못 찾겠음. 흠.
    from oauth2client.service_account import ServiceAccountCredentials
    import httplib2

    SCOPES = ["https://www.googleapis.com/auth/indexing"]
    ENDPOINT = "https://indexing.googleapis.com/v3/urlNotifications:publish"

    # service_account_file.json is the private key that you created for your service account.
    JSON_KEY_FILE = "KEY.json"

    credentials = ServiceAccountCredentials.from_json_keyfile_name(JSON_KEY_FILE, scopes=SCOPES)

    http = credentials.authorize(httplib2.Http())

    # Define contents here as a JSON string.
    # This example shows a simple update request.
    # Other types of requests are described in the next step.

    content = """{
      \"url\": \"https://myohyun.tistory.com/261\",
      \"type\": \"URL_UPDATED\"
    }"""

    response, content = http.request(ENDPOINT, method="POST", body=content)
    pprint(response)
    pprint(content.decode('utf-8'))
RESPONSE
{'-content-encoding': 'gzip',
 'alt-svc': 'h3=":443"; ma=2592000,h3-29=":443"; ma=2592000,h3-T051=":443"; '
            'ma=2592000,h3-Q050=":443"; ma=2592000,h3-Q046=":443"; '
            'ma=2592000,h3-Q043=":443"; ma=2592000,quic=":443"; ma=2592000; '
            'v="46,43"',
 'cache-control': 'private',
 'content-length': '243',
 'content-type': 'application/json; charset=UTF-8',
 'date': 'Fri, 10 Sep 2021 10:31:48 GMT',
 'server': 'ESF',
 'status': '200',
 'transfer-encoding': 'chunked',
 'vary': 'Origin, X-Origin, Referer',
 'x-content-type-options': 'nosniff',
 'x-frame-options': 'SAMEORIGIN',
 'x-xss-protection': '0'}
{'urlNotificationMetadata': {'latestUpdate': {'notifyTime': '2021-09-10T10:31:48.050047979Z',
                                              'type': 'URL_UPDATED',
                                              'url': 'https://myohyun.tistory.com/261'},
                             'url': 'https://myohyun.tistory.com/261'}}
참조
- 배치처리 관련: https://googleapis.github.io/google-api-python-client/docs/batch.html
- 구글API 파이썬 클라이언트: https://googleapis.github.io/google-api-python-client/
- https://github.com/googleapis/google-api-python-client/tree/main/samples
- 배치 참조용(php클라이언트 소스): https://github.com/googleapis/google-api-php-client/issues/1567
- www.googleapis.com/batch/indexing/v3.
- https://developers.google.com/search/apis/indexing-api/v3/using-api


